A quick way to get rid of unwanted color casts in your photographs.
As you may know, I am a keen amateur photographer. But, one of the most annoying things is that I can never seem to get the color balance right in the field. Its a skill I am still learning but, of course, even the best professional photographers tend to do a bit of post processing these days. So, here is a quick and easy way to get rid of unwanted color
casts in your photographs. It is the method that I was shown by a good friend who runs Zoe Rae Photography, and it works like a charm on almost any image. This tutorial is for Photoshop users so I am uncertain whether it would translate to other programs such as PaintShop Pro. I’m going to present it in a bare-bones fashion, no explanations of the theory behind it, just the steps involved in action. So without further ado, let’s get right to it!
Halfway there…
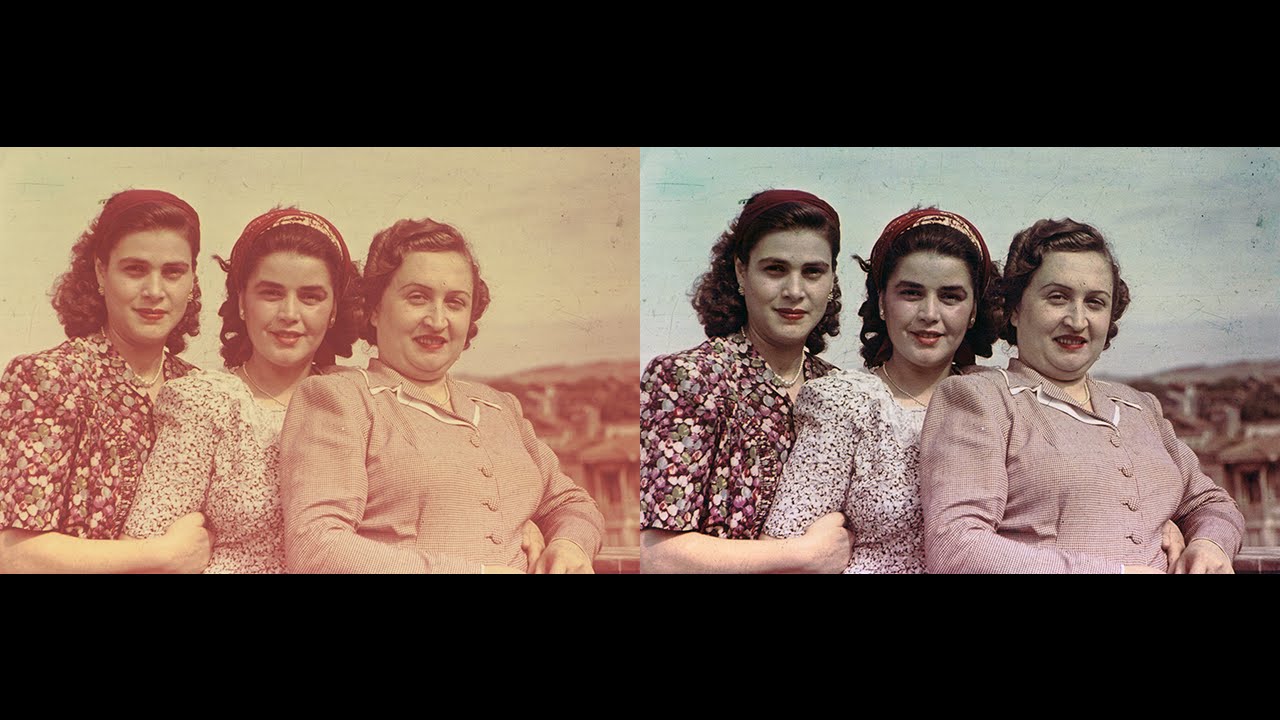
First open your photo in Photoshop and duplicate it. (Just so at the end you can toggle and see the difference between start and finish.) For this example I am using tampadan’s Mother and Daughter photo because of the strong yellow/green cast it has.
Once the image is opened and duplicated go to Image – Adjustments – Threshold and move the slider all the way to the left until you are left with just a little blob of black about 5 pixels across, no smaller. Move the cursor over it (you will have defaulted to the eyedropper tool) and hold Shift and then click on the blob. This will set a marker on your image.
Now go back to the Threshold slider and pull it all the way to the right until you are left with just a small blob of white 5 pixels across and Shift/click on it too. Again this will set a marker, and it will be numbered #2. When doing this pick make sure the white blob is not one made by a shiny highlight in your image. For example the glint off of glasses or any reflection off of metal is not good to use. (You can click on and off the Preview checkbox in the Threshold dialog to see what you are picking.)
Cancel out of the Threshold dialog box. Don’t worry about the markers disappearing, they’ll come back.
Page 3: Finishing up….
Go to Image – Adjustments – Curves. In the curves box you will see three eyedroppers. It is suggested that you preset the white point in the Curves dialog. Do this by double clicking on the white (right) eyedropper, then set the RGB values to 240. This prevents any real trashing of detail by over whitening. There is also a theory that you should change the RBG values for the black (left) eyedropper to 20, but I think that is really more of a personal preference on your part.
Now chose the left eyedropper (single click on it), the dark levels one, then go to your image and click on the marker, #1, you set when you had the threshold levels to the left. Then click on the right eyedropper and click on the marker you set with the light, or right threshold level, the one marked #2. Next is the middle eyedropper. This is the only real judgement call you are going to have to make. You need to click on an object you recognize that shouldn’t contain any color at all. A grey object preferably. Perhaps the tire of a car, a grey stripe in a shirt, the pavement of a road, etc. In this example I used the daughters shirt up near the collar. (If you are stuck then go to the Info palate and take the
eyedropper for a tour around your image. Look at the RGB numbers. Find a spot in your image where they are as close to being equal to each other as possible (because equal parts of red, green and blue equal grey) and click there.
If you are not entirely pleased you can try clicking the middle dropper in another grey area for a different result. Remember that you should only be using the eyedroppers that help. Sometimes a color cast is wanted, like in a sunset, or a fire. In that case just use the ones that help, probably the middle and black ones. Finally, toggle back and forth between the original and the adjusted images to make certain that you are satisfied with the results, then save.
If you follow these steps then you images should come out well color balanced in less than 5 minutes worth of easy work!